A properly installed radon gas removal system is one of the most effective tools in protecting your family from the dangers of long-term radon exposure. Once in place, it continuously works in the background, venting radioactive radon gas from below your home to the outside atmosphere. However, like any mechanical system, it can malfunction, degrade, or become less effective over time.
If you've noticed irregularities in your system or recent radon test results show elevated levels, it's time to troubleshoot. This guide walks you through the most common radon mitigation system problems, how to identify warning signs, and what steps you can take to fix or maintain your system.
Understanding Your Radon Mitigation System
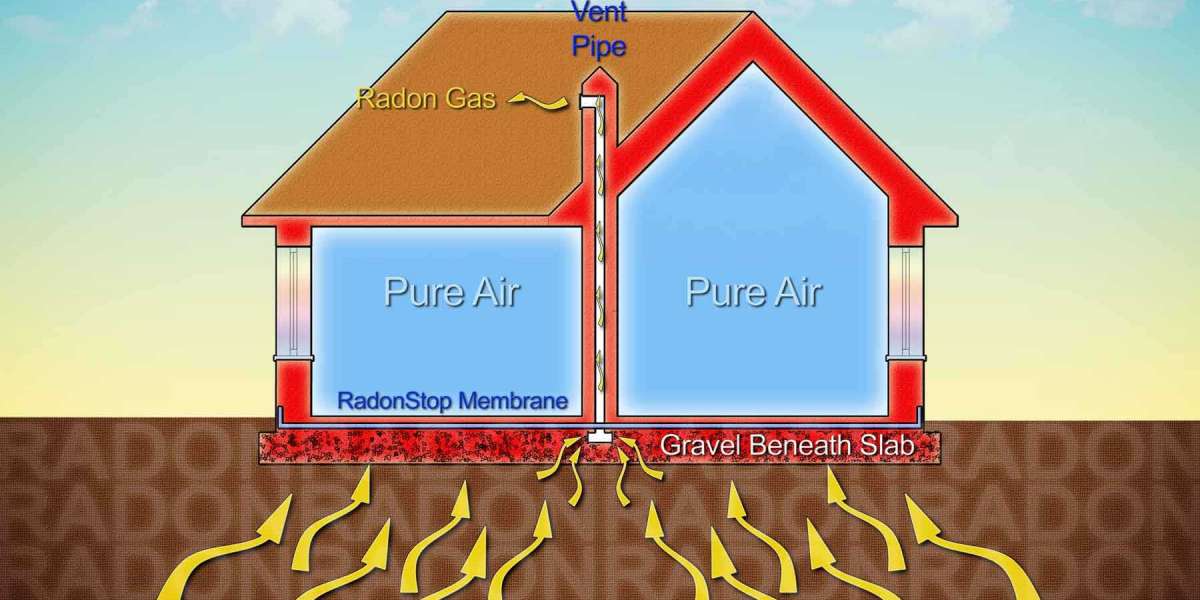
Before diving into troubleshooting, it's helpful to know how your system works. Most radon mitigation setups use a method called sub-slab depressurization, which includes the following core components:
- PVC Piping: Draws radon gas from under the foundation slab or crawlspace.
- Radon Fan: Creates suction to vent the gas through the pipe system to above the roofline.
- Vent Pipe: Exits above the roof to safely release radon outdoors.
- Manometer: A U-shaped pressure gauge used to visually confirm fan operation.
- Sealing Components: Caulking, vapor barriers, or sealed sump pump lids prevent radon entry from other areas.
Knowing what each part does makes it easier to pinpoint issues and recognize symptoms of system failure.
Why Troubleshooting Matters
Radon exposure doesn’t produce immediate symptoms — it builds silently over time, increasing your family’s risk of lung cancer. That’s why catching system problems early is crucial. If your mitigation system isn’t functioning as it should, radon levels may rise unnoticed.
Failing to address these issues could:
- Expose your household to unsafe radon levels
- Reduce system efficiency
- Shorten the lifespan of components like the fan
- Compromise your home’s resale value
Common Signs Your Radon System Needs Attention
Here are key indicators that something may be wrong:
- Equal levels in your manometer (U-tube gauge)
- No sound or vibration from the fan
- Unusual fan noises (grinding, squealing)
- Visible cracks in foundation or new gaps in basement slab
- Condensation in the pipes
- Unexpected spikes in radon test results
- Unsealed sump pump or foundation cracks
- Blocked or obstructed vent pipe
If you notice any of these issues, don’t ignore them. They often indicate the system is underperforming or has failed.
Troubleshooting Checklist: Step-by-Step
Step 1: Check the Manometer (Pressure Gauge)
The manometer is a U-shaped tube filled with colored liquid, mounted on the pipe near the fan. It’s your first clue that the system is working.
- Uneven liquid levels: This indicates the fan is pulling suction — a good sign.
- Equal levels: The fan is likely not operating.
? Troubleshooting Tip: If the manometer levels are equal, check the power source (circuit breaker, outlet, or switch). Reset the breaker if needed. If the fan still doesn’t start, it may need replacement.
Step 2: Listen for the Fan
Your radon fan should operate continuously. It may hum quietly or vibrate slightly.
- If there’s no noise: The fan may have failed or lost power.
- If you hear grinding or rattling: Bearings may be wearing out.
? Troubleshooting Tip: If you’re unsure whether the fan is running, place your hand on the fan housing or pipe to feel for vibration. If silent, test the power outlet or switch. If it's powered and still silent, the fan is likely dead.
Step 3: Inspect the Exterior Vent Pipe
The vent pipe expels radon gas above the roofline. If it’s blocked or damaged, radon can back up into your home.
Look for:
- Bird nests or debris in the pipe
- Snow or ice accumulation during winter
- Cracks or disconnections in piping
- Incorrect slope, leading to water buildup
? Troubleshooting Tip: Use a flashlight to inspect inside the vent opening. If clogged, contact a radon mitigation professional to clear it safely without damaging the system.
Step 4: Test Your Radon Levels
Even if your system seems operational, the only way to confirm effectiveness is by testing.
- Use an EPA-approved radon test kit (short-term or long-term)
- Place the test in the lowest livable area of your home
- Follow instructions precisely and send it to a lab
? Troubleshooting Tip: If test results exceed 4.0 pCi/L, your system may not be reducing radon to safe levels — even if it’s running. You may need to increase suction, reseal cracks, or add additional suction points.
Step 5: Look for New Cracks or Gaps
Foundation movement, settling, or seasonal temperature changes can cause new cracks to appear. These may allow radon to bypass the mitigation system.
Inspect:
- Basement floors and walls
- Expansion joints
- Around pipe penetrations
- Sump pit covers
? Troubleshooting Tip: Seal new cracks with urethane caulk or an appropriate concrete sealant. Ensure the sump pump pit is tightly sealed with an airtight lid.
Step 6: Inspect for Condensation in the Piping
Moisture inside the system piping can reduce airflow, damage the fan, or cause freezing in winter.
Causes include:
- Poorly sloped piping that allows water to pool
- Lack of drain ports near the fan
- Excessive humidity in the suction area
? Troubleshooting Tip: Check the piping near the fan for signs of water. If condensation is present, the fan or pipe slope may need adjustment. Install a condensate bypass or drain valve if needed.
Step 7: Check the Fan’s Electrical Supply
Fans are typically hardwired or plugged into a GFCI outlet. If the fan stops suddenly:
- Check for tripped circuit breakers
- Look for loose plugs or damaged cords
- Inspect nearby power switches
? Troubleshooting Tip: If the breaker keeps tripping, the fan motor may be faulty and drawing too much power. A professional should replace the fan with a properly rated model.
When to Call a Professional
Some radon system issues require a certified mitigation technician, especially if they involve:
- Fan replacement
- Pipe reconfiguration or extension
- Sump sealing or crawlspace encapsulation
- Adding additional suction points
- Persistent elevated radon levels
Don’t attempt complex repairs if you’re unsure — poor installations can result in system failure or even dangerous backdrafting of combustion gases.
Preventive Maintenance Tips
Keeping your system in top shape reduces the need for frequent troubleshooting. Here are preventive actions you should take:
✅ Monthly:
- Check the manometer for proper suction.
- Listen for fan noise or vibration.
✅ Every 3–6 Months:
- Inspect exterior pipes and vents for clogs or damage.
- Ensure sump pit covers are sealed.
✅ Annually:
- Perform a radon test to verify system effectiveness.
- Check for new foundation cracks or slab gaps.
- Clean around system components to remove dust and moisture.
✅ Every 5–10 Years:
- Replace the radon fan as needed (most have a 5–7 year lifespan).
- Have a certified professional inspect the system for wear and compliance with current codes.
Troubleshooting Summary Table
ProblemLikely CauseAction
Equal levels in manometer Fan not running Check power, replace fan if needed
No fan noise Electrical failure or fan burnout Test power source, replace fan
High radon levels System failure or new entry points Re-test, seal cracks, evaluate system
Strange fan noises Fan motor or bearings failing Replace fan
Water in pipes Poor slope or condensation Adjust piping, install drain
Clogged vent Debris or ice blockage Clear vent, install screen cap
Foundation cracks House settling or aging Seal with urethane caulk
Final Thoughts: Stay Proactive, Stay Safe
Your radon mitigation system is your home’s first line of defense against a hidden, radioactive threat. Fortunately, when working properly, it’s incredibly effective and low-maintenance. But don’t take it for granted.
Regular inspections, periodic testing, and prompt troubleshooting are key to keeping your system effective. Don’t wait for health symptoms or property transactions to discover a failure.
By following this troubleshooting guide, you’ll be better equipped to:
- Identify system failures early
- Know when to DIY and when to call a pro
- Extend your system’s lifespan
- Maintain healthy indoor air for years to come
Remember: Just because radon is invisible doesn’t mean it should be ignored. Stay informed, stay safe, and breathe easy.
Would you like this guide turned into a downloadable PDF or paired with a printable troubleshooting checklist?