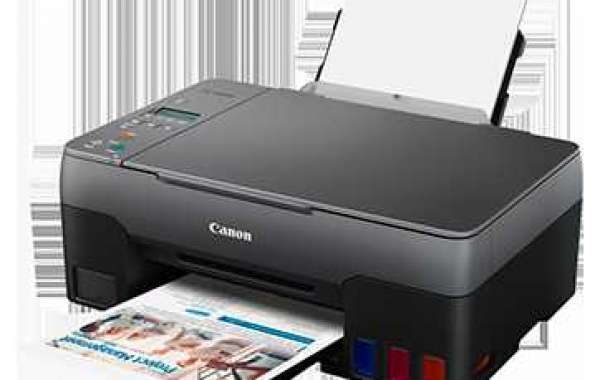
ij.start.cannon is a small printer that allows users to print, scan , and send their documents to fax. It's a great printer for small and large-scale businesses. Canon Pixma TR4522 offers easy, efficient office printing with a small size.
Canon Pixma TR4522 printer is an all-in-one printer which allows customers to scan, print, and send their documents to fax. So, once the purchaser purchases this Canon printer, it's essential to follow the setup process. Therefore, users are advised to review the Canon Pixma TR4522 wireless set-up procedure.
There is an automatic document feeder as well as an integrated fax feature. This means that the automated feeder allows users to scan or copy multiple pages in one operation. Additionally, users can connect the Canon pixma TR4522 through a network router or USB cable. Additionally, users can connect to the internet using the downloaded applications that are stored in the printer, which allows users to print out the information or data from news or entertainment services.
Canon Pixma TR4522 Setup Procedure
After purchasing the Canon pixma customers are advised to follow the pixma TR4522 wireless setup process. So, after the user has completed the setup process it is possible to perform any printer-related task like scanning, printing, and or faxing easily and quickly. Follow the setup instructions in the following.
Turn "ON" Printer
- Users are advised to switch "ON" the printer.
- Make sure to turn "ON" the canon printer by connecting one end of the power cable into the power socket, and the other end on the back of the printer.
- Following this, printer users should switch "ON" the operational panel of the printer.
- Click on"Power" and then click on the "Power" button.
- Users are now advised to choose the language of the printer.
- Be aware of these keys for navigation to select the desired language.
Install the cartridge for your Canon printer.
Users are advised to be patient and wait for the carriage to stabilise. When the carriage is stable then follow the steps outlined in the following paragraphs to set up your Canon print cartridge.
- Take the tape off the ij start canon.
- Be careful not to play with the contacts on the cartridges of your printer.
- Following this, users are advised to insert the black cartridge into the left slot, and then insert the colour printer cartridge into the slot on the right.
- It is advised to insert the Canon printer cartridge at an upward angle inside the slot.
- Important: Once you have placed the Canon printer cartridge it is recommended to secure it.
Close the cover of the Canon printer.
The paper tray should be loaded.
- Users are advised to remove the tray of paper and then put it down when you hear the click sound.
- Then you can slide the purple paper guide, and then slide it to the left side.
- Following this, users are advised to store their paper within the paper tray.
- Be careful that you do not over-exceed the paper limit.
- Then, carefully adjust the guide using the assistance of the edges of the paper to make it more clear.
- Be sure to ensure that there isn't any bent paper as it could cause an issue with paper jams.
- After placing the paper in the tray, users are advised to place the tray of paper into the printer with care.
- The users are now advised to adjust the paper settings to meet their requirements on the printer's display.
This is all about the Canon pixma TR4522 wireless configuration procedure. If a user is unable to connect to the official website, i.e., ij.start.cannon then you can contact Canon's customer service team to get real-time assistance.